Ten Kisses
As a wedding photographer, I end up taking a lot of romantic shots. The couples who hire me are usually marking a milestone in their relationship–an engagement, a wedding, an anniversary, the impending birth of their baby–and their joy of being with each other shines through. They often speak intimately, laugh, embrace, and kiss. A lot.
As a photographer, I am truly inspired when I see this kind of intimacy between a couple. Sometimes, I get a lump in my throat. It’s one of my favorite aspects of my work, to capture people’s love and happiness in beautiful images. Here are 10 of my favorite kissing scenes that I had the pleasure of capturing recently.


Light in a Mesh Cave
I recently did a photo shoot with two friends walking through a wire installation by Seattle artist Sophia Wheelright. I wanted to make the images dreamy, and asked my friends to wear long, flowing dresses. I love how the light is coming through the installation. The women look almost like they’re walking through a cave, and some of the photos remind me of Greek myths.
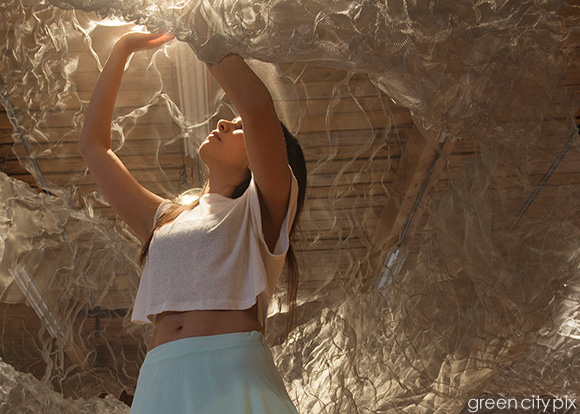


If you’re interested, see more photos from this series.
The Poetry of Construction

Construction is booming in downtown Seattle. Developers are planning to build 42,000 apartment units by 2017. The men work in the open air, rain or shine, and now in frigid weather. I decided to take some pictures to show the poetry of their work.

The guys in the construction site in front of me have seen me working in my office, taking photos of people, drinking coffee, taking yoga breaks. Sometimes one of them will give a friendly wave, but usually, there’s a respectful distance.

The men do strenuous work of lifting heavy weights, hammering, putting floors and ceilings in. They are tethered to prevent them from deadly falls.

They eat lunch in a room where there are no walls yet.

This crow and I were watching the scene together. In the evenings, we catch the gorgeous sunset.


Autumn Beauty
I recently did a photo shoot to capture the beauty of fall. The skies in Seattle may be gray, but the ground is bursting with color. Here are my favorite shots from the photo session, which took place at Seattle Center.

Thanks to my model for rocking a dress and heels on a bicycle! This image reminds us of the Netherlands, the land of tulips and bicycles.


Please note, my photos now bear the Green City Pix watermark. I recently became a wedding and special events photographer because I love making beautiful images. I hope you enjoy my work as much as I do.
Thank You, World

Last Saturday, I had a very strange experience in Cannon Beach, Oregon. The area was covered with a thick fog, and it felt like I was on another planet. I could hear the ocean, but could not see it. There were other people, but they were faint figures in the distance, like shadows or ghosts.
I hadn’t gotten much sleep the night before and I was pretty stressed out. I thought the foggy beach was a good metaphor for life: We know what’s ahead of us, but we often cannot see it, nor the people around us.
I wanted to turn around and go home, but because my friend was with me, I mustered a smile and tried not to ruin the moment for her.
I was worried about my business and questioning my life in general. A few months ago, I left my comfortable job in the web industry to pursue photography full-time. I’d saved enough money to do this, but my mind was filled with doubt. What was I thinking? How foolish was I to believe that I would succeed in the over-saturated photo industry?
A few photographers I’ve met have told me it’s a cut-throat field. I don’t want to see it that way. I’m motivated by the joy I get from making good images, but is that realistic?
I dragged my feet across the beach, falling several steps behind my friend. I wrote in the sand, “What next?”
After what seemed like hours, the sun finally came out. I wrote this sign of thanks in the sand.
As I stepped back to take a photo, this man and his daughter unknowingly walked into the shot, making it an even better picture.
It made me really happy to see this scene.
It just goes to prove that when you leave your fears and are instead grateful and open-minded, beautiful things happen.
This was the beach before the fog cleared.

Changing a Scene with Photoshop’s Content-Aware Move Tool
I’ve been playing around with the Content-Aware Move tool in Photoshop CS6. I use this to change elements of a scene. You can get similar effects using the clone stamp, but I’ve found that the Content-Aware Move tool gives me better control in larger scenes. Check out what I did below and let me know what you think!
This is Ali, a woman who loves adventure. I met her at Gasworks Park in Seattle. It was a beautiful day and lots of people were out and about.

There’s nothing wrong with this scene, but I wanted to see what would happen with some creative editing. Using the Content-Aware Move tool in Photoshop, I removed the people and filled in the sky and the ground.

Here’s the final image with the ground cropped out to focus on the subject of the picture.

You can access the Content-Aware Move tool through the icon with the intertwined arrows. The Adapation settings from Very Strict to Very Loose will give you different results.
As always, I’m interested in what you think. Let me know which of these photos you like best by commenting or taking the poll. Thanks, and have a creative day!

Changing the color of a flower in Photoshop

Ever want to change the color of something in a photograph? This is a Photoshop project that I did some time ago during a plane ride. Changing the color required 4 steps in 3 different layers in Photoshop.
- Cut out the flower from the background and put it in a second layer.
- Make the first layer black and white.
- Cut out the center of the flower from second layer, put that in the third layer. Keep that as yellow.
- Go back to the second layer, play with the hue bar in Image > Saturation.
Here’s the original image, which was taken with an iPhone 4S. I think either one of the edited pics is more interesting than this one. What do you think?

The beauty of minimalism in photography

This is a picture I edited a few months ago. I really like the minimalist composition and the crisp contrast between the black and white. I used the Snapseed app to achieve this effect, but this could be done easily on Photoshop and other editing tools too.
The original picture was in color and taken with an iPhone 4S. It was around sunset time, and it was one of those glorious days with no clouds in the sky. Problem is, since there were no clouds, there was no texture in the sky, and the overall picture looked kind of bland.
I also tried boosting the saturation to really bring out the sunset colors, but I think the black and white version turned out better. My friends on Instagram seem to agree. What do you think?


Combining Two Images in Photoshop, Part II
Since my last post on combining two images in Photoshop, I’ve been using more advanced techniques in compositing and masking. This time, I added a subject to a new environment to create a very interesting scene. The final picture became popular on 500px within the first half hour.
First, I had this picture, which I took at a fashion show in January. The model and dress were beautiful, but the background was so blah that the picture as a whole didn’t work.

I decided to add the model to a new environment. I looked in my files for a good picture, and came upon this shot, which I took in Sayulita, Mexico during a vacation last December.

I used the same compositing techniques in Photoshop that I outlined in my last post to combine the two pictures. This was the first result:

Pretty cool, heh? I was pleased with how the beach scene was made even more interesting with the woman walking along the shore. However, I felt like the masking and compositing looked a bit obvious. The light on the beach was coming from the front, but the woman was being illuminated from the back. What to do?
I decided to try masking the woman more to make the overall scene more realistic looking. Parts of her became transparent, but this would subdue the light coming from her back.

Mask further to make parts of subject transparent

Ta-da! Here’s the final result. I thought this looked a lot more natural. But could it fool the experts? I decided to put it up on my profile on 500px, which I consider to be the ultimate test in photography. I was very happy to see that the picture scored a 93 and hit the popular section within the first half hour. Yay!
Combining Two Images in Photoshop
Today, I learned a neat technique of combining two images in Photoshop to improve the overall picture. I’ve practiced this technique four times already today, and it’s great fun.
First, I had this picture of my friend Kiana. I think her face looks very pretty, but I was curious to see if I could combine this with another picture.


I liked her long legs and boots in this pose, but I didn’t think her facial expression worked as well. Because of the differences in size and angles of the two photos, I knew it would be a challenge to make the composite look natural. But with a little patience, I saw how Photoshop can make pretty much anything possible.
Ta-da! Here’s the result:

I’m excited to start using this technique for more advanced composites and make some truly stunning images.
Here are the instructions to combine two photographs.
- Put the pictures in two separate layers.
- Make the top layer transparent and move it to lay on top of the second image as desired.
- You can try using Edit > Auto-align to align the two pics. (In the above example, I couldn’t use auto-align, and actually had to rotate the second image so that the position of the head would look natural.)
- Add layer mask on the top layer.
- Choose the paint brush. Choose black for color. Adjust hardness to 0 on the brush.
- Use the brush on the mask.
- The new face should appear as if by magic.
- If you find that you’re masking too much, switch the brush color to white and go over the parts of the mask you want to adjust.
- Try changing the brush size and hardness to 100 to fine-tune the image.
- For an additional effect, put a levels layer at top and adjust colors.
 I create stories,
fast fresh web by Sasha Mastroianni is licensed under a Creative Commons Attribution-NonCommercial-ShareAlike 3.0 Unported License.
Based on a work at fastfreshweb.com.
Permissions beyond the scope of this license may be available at http://fastfreshweb.com.
